 Printwear & Promotion The Total Promotional Package
Jamie Hood from David Sharp tells all on faux embroidery, its benefits and how you can achieve it.
Faux embroidery, as it has become known, is the process of digital printing that mimics and appears like real embroidery when printed or pressed onto a garment.
The idea being that when your clients are out and about in the world, to passers-by, it will appear like their garments are branded with embroidery instead of a humble print.
Looking for a new and unique product to offer? Don’t do embroidery? Then faux embroidery printing could be for you.
Why? What exactly are the benefits of faux embroidery?
Here are a few reasons why you should get into faux embroidery:
1) Cost!
The rise of direct to film transfer printing in recent years has made great quality prints very affordable, even for small runs.
With small breast size transfers starting from a few pennies each it’s hard to ignore the attractive cost element compared to traditional embroidery. Now if you consider that what you could be printing could visually replicate embroidery, you have a very attractive concept indeed.
2) Apply to garment in seconds
DTF transfers can be heat pressed to garments in a mere 10 to 20 seconds. Making light work of a large order and getting jobs out the door faster.
The time an embroidery job spends on the machine is determined by the stitch count and number of stops and trims. Not something you need to worry about if you’re dealing in faux embroidery printing.
3) Comfort for the wearer
Pick up any printed garment, printed with a DTF transfer, and give it a really good stretch. It’s incredibly forgiving and stretchy. Zero irritation on the inside of the garment too, making it ideal for sportswear and childrenswear alike.
4) One file, multiple size placements
With embroidery, if you plan to stitch a logo in different sizes and different garment placements, you will need more than one digitised file. With faux embroidery you may only need one file. Just scale it up and down in size as needed and print away.
5) You are not bound by the normal rules of embroidery
When we design an embroidery file, we respect a number of golden rules to ensure it looks good when stitched, and also runs efficiently on the embroidery machine. One example rule is letters must be 4mm high minimum.
But with faux embroidery you don’t need to worry about anything as the design will never see a needle or thread – you are printing it only! Tiny text/ mega long stitches/ huge number of colours? It does not matter. Fill your boots.
6) Caps are now a breeze!
Ask anyone that embroiders caps if they like it, most will say they do not. A special cap frame and embroidery machine attachment. Size limitations and quality issues if the design file is not designed correctly for caps. Remove all those headaches with a DTF transfer that looks like embroidery and applies in seconds? Tempting!
Interested? How can you get going…
With faux embroidery printing the artwork file is key.
The printing process is exactly the same as normal, it’s the image file that transforms it into a fake embroidery. Here’s how to create said file:
Well, you can ask your digitiser. Any good embroidery digitiser should now be able to provide you with a faux embroidery artwork file that is print ready. Want to create your own? Read on.
1) Start with an already completed embroidery designed file. This needs to be done first. If you already have one completed then great. If not, this needs to be created first or requested from your embroidery digitiser as normal.
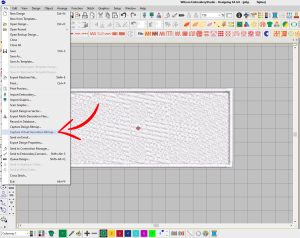
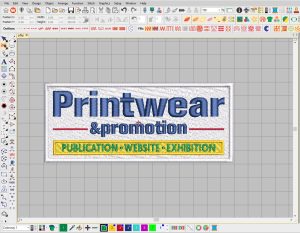
2) Then you need to save a high-resolution PNG image of this embroidery design file, at around 300 to 500dpi. Wilcom Embroidery Studio does a great job of this but there is other embroidery digitising software that will also export a high-resolution print ready image – such as Design Shop 12 from Melco.
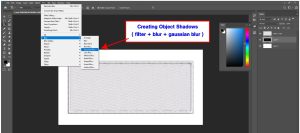
3) Shadows for the win! This, as it’s a PNG, has no background and technically is print ready but we want to take it a step further to make it more life-like when printed.
Adding drop shadows gives it more depth and increases the impression of a real raised embroidery when pressed onto a garment. To achieve this, we add outer shadows in Photoshop (you can use your preferred graphics software).
If it’s just text, for example, just save one high resolution PNG file from the original embroidery design – then add shadows. However, if the design has layers, for example text on top of a base of background Tatami stitches, its best to break the design up into multiple layers and add shadows to each layer separately.

This, crucially, gives internal shadows to objects and letters and not just one shadow around the outside of the finished design. To break the file up into separate PNG files, work from the bottom upwards (so base layer solid objects as PNG one, then details and text as another file).

Once all layers have had shadows added then everything can be pieced back together to make one file ready to print.

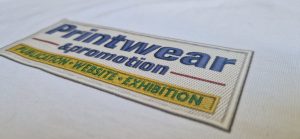
The finished photos show the final result once the image has been printed as a DTF transfer and then heat pressed to a T shirt. The shadows, even though only 1 to 2mm deep, really lift it off the garment visually. So, life like it will cause disbelief among those that touch the print and see it is in fact a flat digital print.

So, there you have it, the humble process of DTF printing can now be used to create realistic faux embroidery, adding a whole new level to your client offerings.


