 Printwear & Promotion The Total Promotional Package
Ever noticed that the borders around your embroidery don’t quite match up with your fill stitches? Or wondered why your ‘N’ looks noticeably larger than your ‘O’? Elizabeth Woodhouse from The Embroidery Academy tells all.
The answer lies in the push and pull effect – a natural reaction caused by stitch tension and direction on the fabric.
This distortion can vary depending on factors like stitch density, fabric type, underlays, and stabilisers. But don’t worry! Understanding how push and pull work is the secret to achieving the best results every time. Let’s look into what causes these challenges and how you can tackle them to create embroidery perfection.
How do satin stitches react?
- Pull effect: Satin stitches pull the fabric inward along the stitch direction, making the stitched area narrower than expected.
- Push effect: At the ends of the stitches, the fabric is pushed outward, causing the edges to expand slightly.
This is most noticeable at stitch endpoints, where shapes like rectangles may appear longer than planned. For curved sections, such as in letters like ‘O’, ‘C’, or ‘S’, the tension causes the curves to retract, making them look smaller.
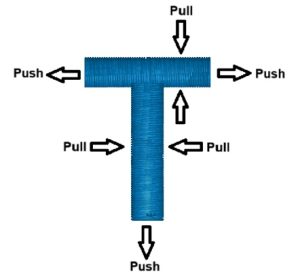
Example of satin stitch push and pull
If you’re embroidering a letter ‘T’ on a stretchy fabric:
- The vertical stroke may pull inward, looking too thin (pull distortion).
- The ends of the horizontal stroke may extend outward making them longer (push distortion).
- To counter this, apply pull compensation by widening the vertical stroke slightly and push compensation by reducing the length of the horizontal ends.

How do fill stitches react?
- Pull effect: Fill stitches pull inward at their widest point along the stitch direction, where the tension is strongest.
- Push effect: At the ends of the stitches, the fabric is pushed outward due to the force of the stitches being laid down.
This distortion can cause shapes to stretch or shrink, which is why borders sometimes don’t align correctly around the shape.
Example of fill stitch push and pull
- The top and bottom edges may push and expand outward, making the circle appear oval or larger.
- The sides of the circle may pull and contract inward, causing it to look narrower.
- To counter this: Always use diagonal or angled stitch directions. When stitches are placed horizontally or vertically, they align with the fabric’s warp and weft. This alignment can cause stitches to sink into the natural gaps in the weave, leading to uneven coverage. Add pull compensation to increase the width of the circle slightly at its sides (the areas most affected by pull) to account for the inward tension. Reduce the height of the circle slightly to counter the outward push effect at the top and bottom edges, maintaining a more balanced appearance.


General tips to minimise push and pull
- Test the design: Stitch a sample on similar fabric to assess distortion.
- Hooping: Ensure the fabric is taut in the hoop without overstretching.
- Stabilisers: Use the correct stabiliser to prevent fabric movement and provide support during stitching. Cut-away stabilisers are ideal for stretchy or unstable fabrics. Tear-away stabilisers work well for stable woven fabrics.
- Adjust density: Ensure you use the correct density of stitches to lessen the tension on the fabric.
- Use underlay stitches: Underlay stitches provide a foundation for the design, distributing tension and minimising distortion. Edge-walk underlay reduces pull along the edges. Zigzag or grid underlay supports the fabric beneath the fill and columns.
- Stitch direction: Alternate stitch angles between adjacent fill areas to balance push and pull effects.
- Compensate in design: Use embroidery software to add push-pull compensation, slightly adjusting the shape and size of the fill area to counteract distortion.
So, to conclude: By stabilising your fabric, adjusting stitch settings, and compensating in your design, you can overcome these challenges and create embroidery where borders align, shapes stay symmetrical, and letters look consistent


