 Printwear & Promotion The Total Promotional Package
DTF unlocks a whole world of new potential, including 3D faux embroidery and crystal patch printing. But with it comes new processes that need to be followed. Luckily, Resolute has decided to explain just that in this two-part column, starting with some guidance from managing director Colin Marsh.

Creating a raised, 3D faux‑embroidered effect with DTF UV is a simple print process, but the application requires specific parameters. The 3D crystal patch uses the same media and application process as 3D faux embroidery, but the two processes give very different results.
Part 1 of this guide is a step-by-step walkthrough from prep to final finish, delivering consistent, durable results for both faux and crystal.
What you’ll need
- A DTF UV printer with a special high flex low odour UV ink loaded, including clear.
- Special embroidery film part A and part B (not standard DTF UV transfer film).
- A heat press and a separate heat plate.
- Lint‑free cloth or microfiber towel.
- Correctly prepared artwork, Adobe Illustrator or Photoshop.
Normally, the texture used in 3D faux embroidery is built with white ink. For crystal patches, you will use the clear to create a domed effect. It is important the printer you are using can do this, or a 3D raised print will not be possible.
Remember, the higher the texture, the longer the print will take. 3D crystal patches do not use white ink and are a semi-transparent gloss or matt domed image. These look particularly good on lighter coloured and clear products.
Printing the 3D textured job
Once your artwork is ganged up correctly in your RIP software, print the job to a PRN file ready to apply your desired level of texture. Make sure to leave some blank film around the images to allow for easy peeling later.
Import the file into your printer software and select the task properties. For 3D faux, choose multiple layers for the white layer – two to four layers are normally enough. If your printer has two white print heads, make sure to select the same number of passes per one, remembering you are doubling up.
Any clear varnish in the artwork will normally require one layer; the default 0 is one layer, so leave this set and do the same with the CMYK. Now print your job.
If you are printing a lot of the same artwork, you can tape the media to the take-up reel and leave it to roll up. 3D texture is not fast on any DTF UV printer, so this process allows you to do other things while it is being completed,
- Pre‑warm the product
This step helps the ink bond more effectively.
- Set your heat plate to 110°C, not the heat press.
- Lay the product flat on the heated surface.
- Warm it just enough to bring the material up to temperature.
- For caps, you may need to pre-press and check the temperature with a laser thermometer if you do not have a bottom heat plate.
- Application – prepare the transfer
Before any heat is applied, you want the transfer to be ready for placement.
- Carefully peel the backing film away from the printed transfer.
- Peel smoothly to avoid stretching or distorting the raised UV ink.
- Keep the exposed adhesive side clean, dust or fibres will affect adhesion.
- Position the 3D faux embroidery transfer
With the product warm, you’re ready to place the transfer.
- Position the transfer adhesive side down exactly where you want the design.
- Using your cloth, rub in a circular motion the entire image to help the adhesive to adhere to the product.
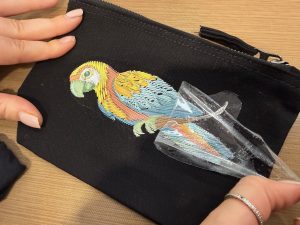
- Slowly peel the overlaminate back on itself, making sure the ink remains on the product, especially any fine detail.
- Final heat press
This locks everything in place and improves durability.
- Set your heat press temperature to 150°C.
- Place the initial backing film over the design; this protects the raised ink during pressing.
- Press for 15 seconds with medium pressure.
- Allow the product to cool a little before handling to avoid distortion.
- Remove the backing film from the front of the image.
Finished Result
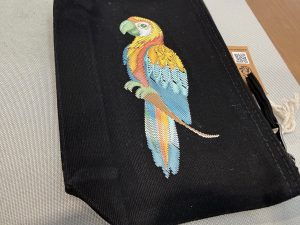
You should now have a crisp, raised design with a durable finish. The texture should feel structured and dimensional. As with any special print process, you should wash any textile items at 30°c, using non-biological soap and no stain removers. Do not tumble dry


